
MeassageQueue
视频学习:黑马程序员Java微服务
网盘资源:https://pan.baidu.com/s/1LxIxcHDO7SYB96SE-GZfuQ 提取码:dor4
学习路线及部分内容参考:Kyle’s Blog
初识MQ
微服务间通讯有同步和异步两种方式
- 同步通讯:就像打电话,需要实时响应,而且通话期间,不能响应其他的电话,时效性强
- 异步通讯:就像发邮件,QQ/微信聊天,不需要马上回复。支持多线操作,时效性弱
同步通讯
微服务间基于Feign调用就属于同步方式,存在一些问题:订单服务,仓储服务,短信服务和支付服务耦合在一起的。
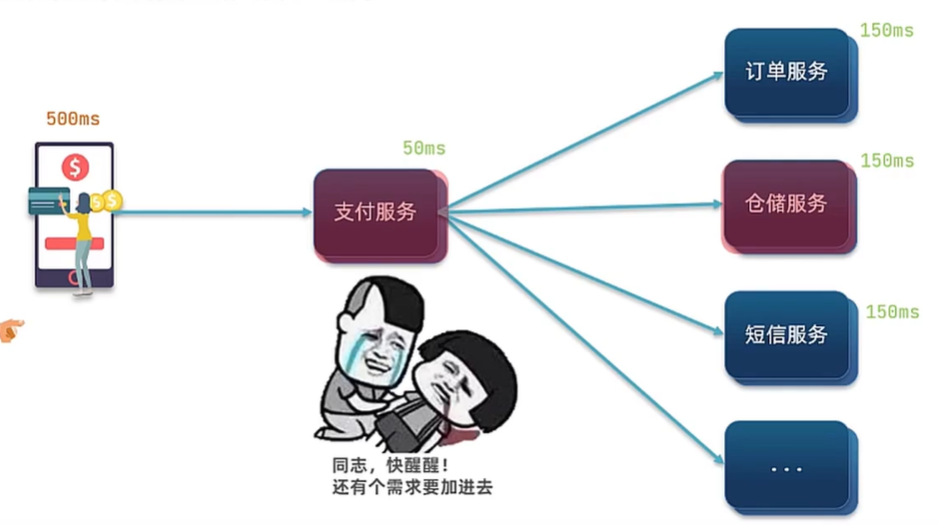
- 产品经理如果让加一个业务,然后就需要去支付服务中改动代码,让你删除某个服务,也需要去支付服务中改动代码,耦合度太高了
- 性能也是一个问题,假如支付服务需要50ms,另外三个服务各需要150ms,那么一个完整的支付服务就需要恐怖的500ms!性能下降,吞吐量下降
- 并且支付服务在等待订单服务完成的时候,也在占用着CPU和内存,啥也不干,浪费系统资源。
- 假如这时仓储服务还挂掉了,那么请求就会卡在这里,如果积压了很多的请求,支付服务就会将系统资源耗尽,从而整个支付服务都挂掉了
综上所述,同步调用存在以下问题
- 耦合度高:每次加入新的请求,都需要修改原来的代码
- 性能下降:调用者需要等待服务提供者响应,如果调用链过长,则响应时间等于每次调用服务的时间之和
- 资源浪费:调用链中的每个服务在等待响应过程中,不能释放请求占用资源,高并发场景下会极度浪费系统资源
- 级联失败:如果服务提供者出现问题,那么调用方都会跟着出现问题,就像多米诺骨牌一样,迅速导致整个微服务故障
异步通讯
异步调用常见实现就事件驱动模式
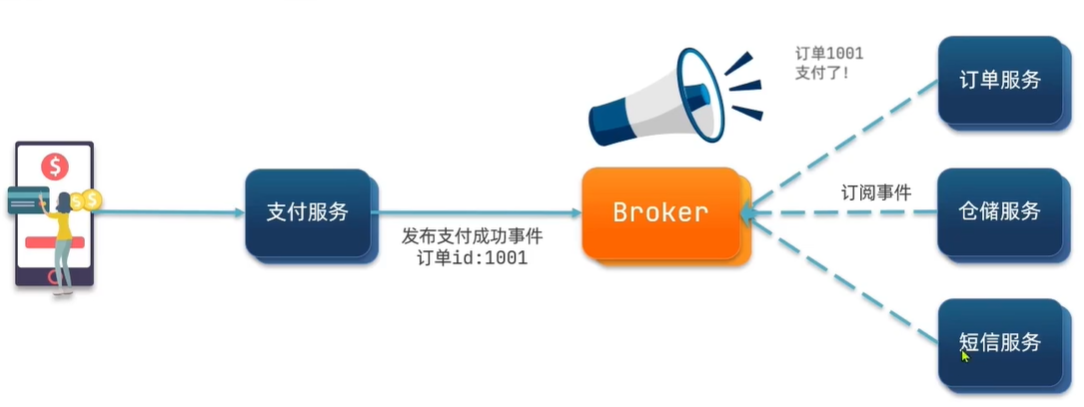
引入事件代理者Broker,用户发起下单请求后,支付服务处理完后就会发布支付成功事件给Broker,事件中带上订单id,然后就直接返回给用户;订单服务、仓储服务和短信服务订阅了事件,如果有订单事件发布,就会把订单id发送给这些订阅者,进行后续的处理。
- 为了解除事件发布者与订阅者之间的耦合,两者并不是直接通信,而是由一个中间人(Broker)来代理。发布者发布事件到Broker,不关心谁来订阅的事件。而订阅者从Broker订阅事件,不关心是谁发布的事件
- 若需要添加一个新服务时,只需要让新服务来订阅事件就好了,而取消一个服务,也只需要让其取消订阅事件,并不需要修改订单服务,这样就解除了服务之间的耦合
- 同时也能带来性能上的提升,之前完成一个支付服务,需要耗时500ms,而现在支付服务只需要向Broker发布一个支付成功的事件,剩下的就不用它管了,这样只需要60ms就能完成支付服务
- 服务没有强依赖,不用担心级联失败问题。在之前,如果仓储服务挂掉了,那么支付服务无法完成,占用资源。此时更多的请求过来,支付服务就会耗尽系统资源,从而整个支付服务都瘫痪了。但是现在,仓储服务就算挂掉了,也丝毫不会影响到我们的支付服务,同时支付服务也不需要等待存储服务完成,期间也不会占用无意义的系统资源。
- 流量削峰:不管发布事件的流量波动多大,都由Broker接收,订阅者可以按照自己的速度去处理事件。
异步通讯的优点
- 耦合度低
- 性能提升,吞吐量提升
- 故障隔离
- 流量削峰
异步通讯的缺点
- 依赖于Broker的可靠性、安全性、吞吐能力
- 架构复杂时,业务没有明确的流程线,不好追踪管理(出了bug都不好找)
MQ常见框架
**MQ(MessageQueue)**中文是消息队列,字面意思就是存放消息的队列,也就是事件驱动中的Broker。通过典型的生产者和消费者模型生产者不断向消息队列中生产消息,消费者不断的从队列中获取消息。因为消息的生产和消费都是异步的,而且只关心消息的发送和接收,没有业务逻辑的侵入轻松地实现系统间解耦。别名为消息中间件,通过利用高效可靠的消息传递机制进行平台无关的数据交流,并基于数据通信来进行分布式系统的集成。
几种常见的MQ对比
| RabbitMQ | ActiveMQ | RocketMQ | Kafka | |
|---|---|---|---|---|
| 公司/社区 | Rabbit | Apache | 阿里 | Apache |
| 开发语言 | Erlang | Java | Java | Scala&Java |
| 协议支持 | AMQP,XMPP,SMTP,STOMP | OpenWire,STOMP,REST,XMPP,AMQP | 自定义协议 | 自定义协议 |
| 可用性 | 高 | 一般 | 高 | 高 |
| 单机吞吐量 | 一般 | 差 | 高 | 非常高 |
| 消息延迟 | 微秒级 | 毫秒级 | 毫秒级 | 毫秒以内 |
| 消息可靠性 | 高 | 一般 | 高 | 一般 |
- 追求可用性:Kafka、RockerMQ、RabbitMQ
- 追求可靠性:RabbitMQ、RocketMQ
- 追求吞吐能力:RocketMQ、Kafka
- 追求消息低延迟:RabbitMQ、Kafka
RabbitMQ快速入门
RabbitMQ概念
RabbitMQ是基于Erlong语言开发的开源消息通信中间件,官网地址:https://www.rabbitmq.com/
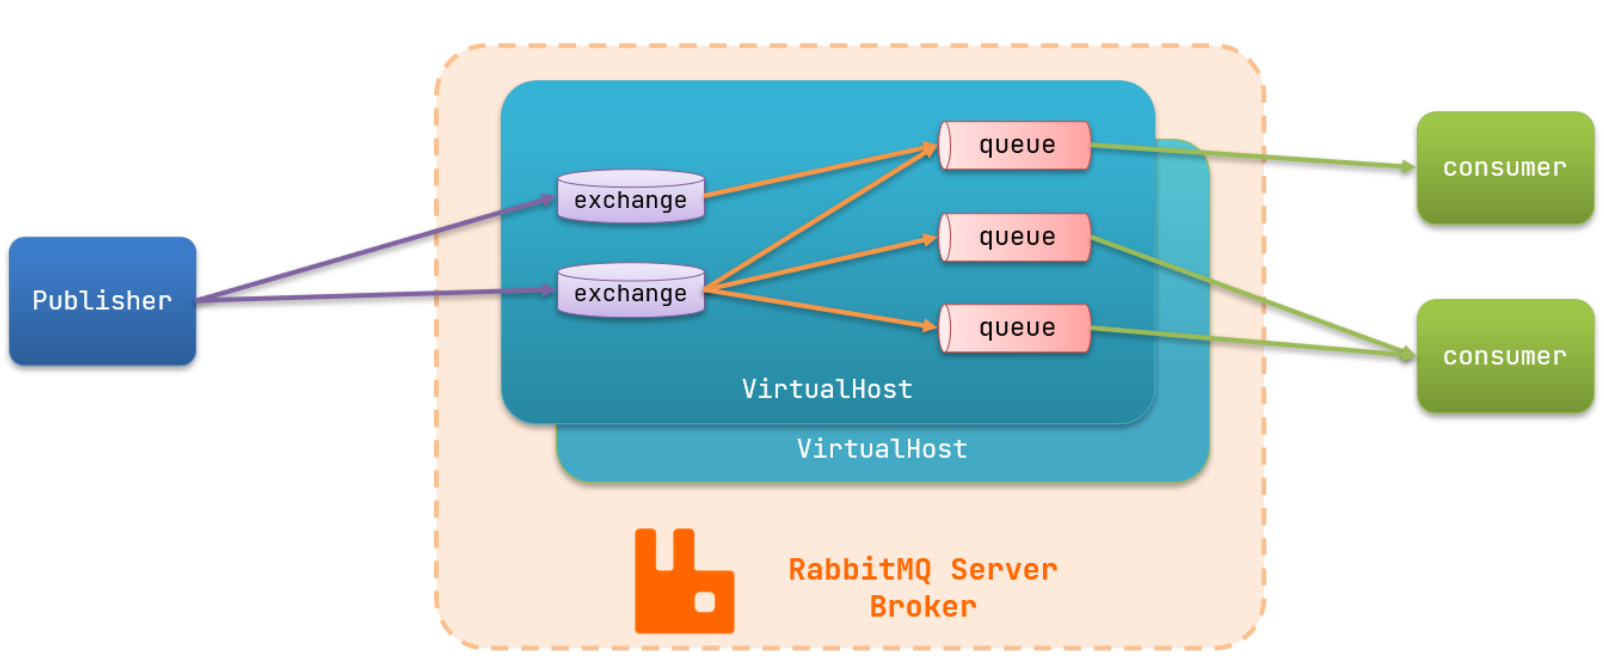
RabbitMQ中的一些角色:
- publisher:生产者
- consumer:消费者
- exchange:交换机,负责消息路由
- queue:队列,存储消息
- virtualHost:虚拟主机,隔离不同用户的exchange、queue、消息的隔离
- channel:操作MQ的工具
RabbitMQ安装
在CentOS 7虚拟机中使用Docker安装
拉取镜像:
docker pull rabbitmq:3-management也可以在资料中上传tar包,使用
docker load -i mq.tar加载镜像使用
docker images查看是否已经成功拉取1
2
3
4
5
6
7
8
9REPOSITORY TAG IMAGE ID CREATED SIZE
nginx latest 605c77e624dd 19 months ago 141MB
192.168.186.128:8080/nginx 1.0 605c77e624dd 19 months ago 141MB
mysql latest 3218b38490ce 19 months ago 516MB
rabbitmq 3-management 6c3c2a225947 20 months ago 253MB
registry latest b8604a3fe854 21 months ago 26.2MB
nacos/nacos-server latest bdf60dc2ada3 2 years ago 1.05GB
joxit/docker-registry-ui static c97caf4d3877 2 years ago 24.5MB
mysql 5.7.25 98455b9624a9 4 years ago 372MB启动一个RabbitMQ容器
1
2
3
4
5
6
7
8
9docker run \
-e RABBITMQ_DEFAULT_USER=root \
-e RABBITMQ_DEFAULT_PASS=root \
--name mq \
--hostname mq1 \
-p 15672:15672 \
-p 5672:5672 \
-d \
rabbitmq:3-management其中:两个环境变量分别配置登录用户和密码,15672是rabbitMQ的管理平台的端口,5672是将来做消息通信的端口
使用
docker ps查看容器1
2CONTAINER ID IMAGE COMMAND CREATED STATUS PORTS NAMES
08f0e5c6cbc3 rabbitmq:3-management "docker-entrypoint.s…" 8 seconds ago Up 6 seconds 4369/tcp, 5671/tcp, 0.0.0.0:5672->5672/tcp, :::5672->5672/tcp, 15671/tcp, 15691-15692/tcp, 25672/tcp, 0.0.0.0:15672->15672/tcp, :::15672->15672/tcp mq
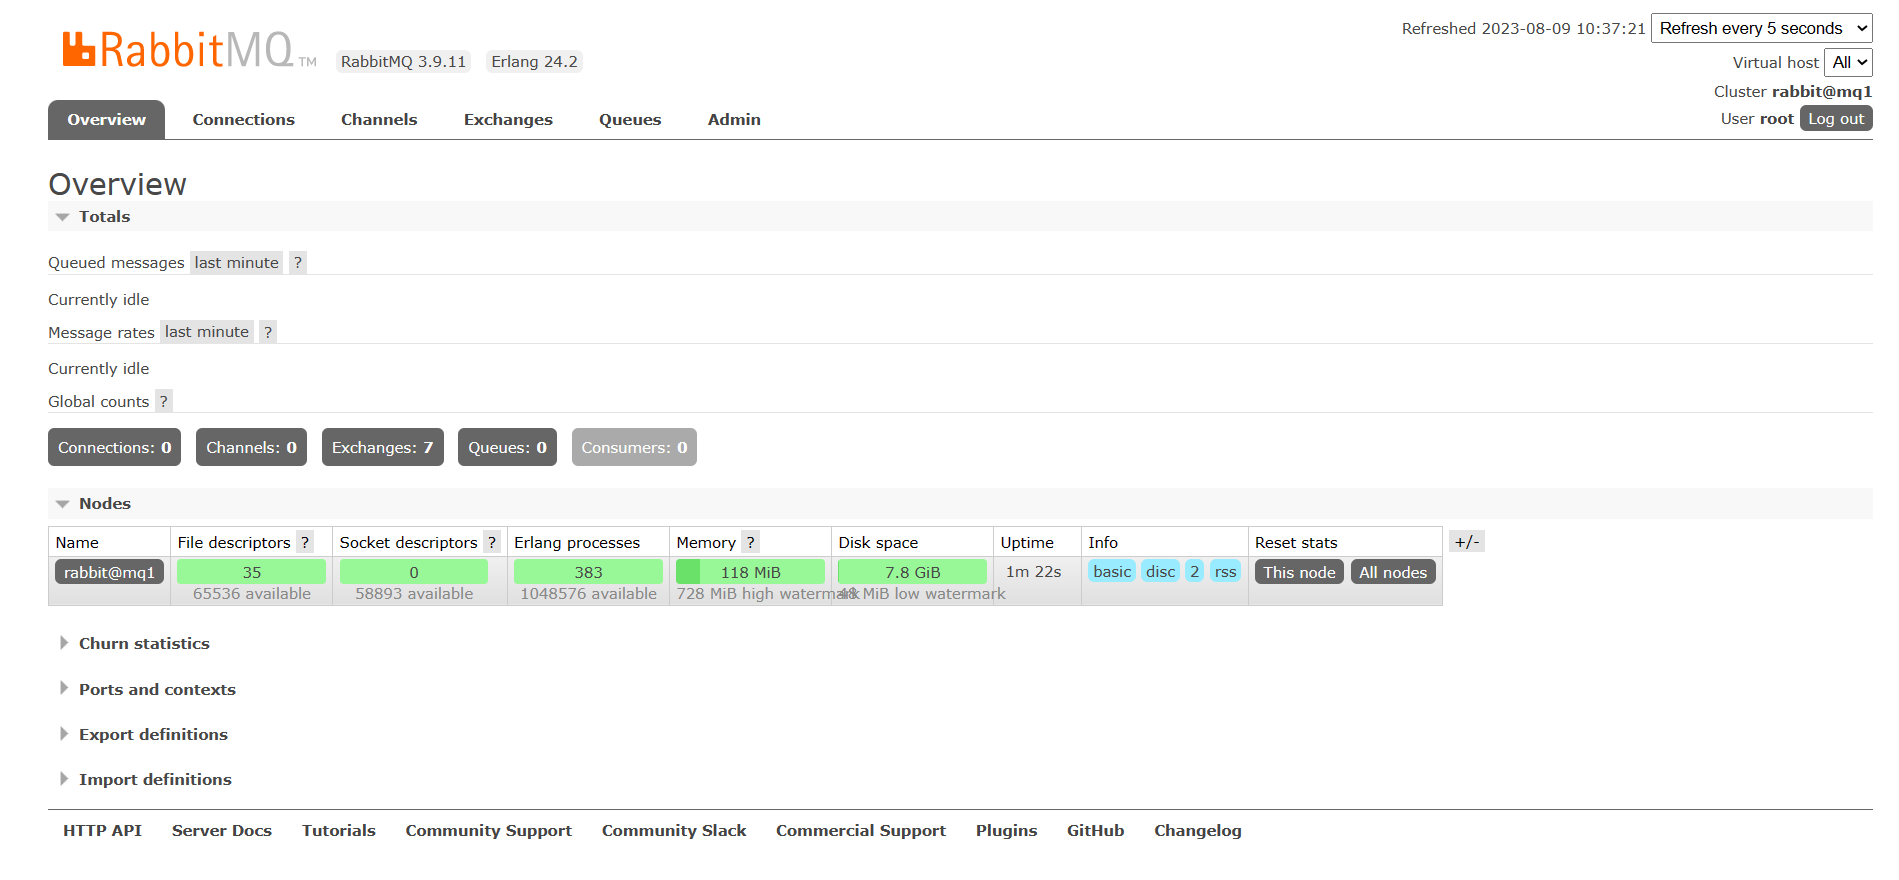
此时浏览器中输入ip:15672就可以查看到管理平台页面
常见消息模型
RabbitMQ官方提供了5个不同的Demo实例,对应了不同的消息模型:
基本消息类型(BasicQueue)
工作消息队列(WorkQueue)
发布订阅(Publish、Subscribe),又根据交换机类型不同分为三种
- 广播(Fanout Exchange)
- 路由(Direct Exchange)
- 主题(Topic Exchange)
快速入门
这里以官方的HelloWorld案例(基本消息类型)为例
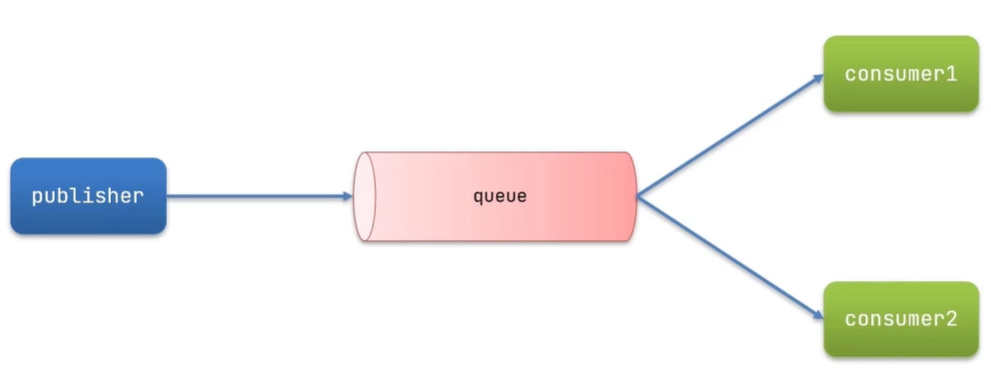
官方的HelloWorld是基于最基础的消息队列模型来实现的,只包括三个角色:
- publisher:消息发布者,将消息发送到队列queue
- queue:消息队列,负责接受并缓存消息
- consumer:订阅队列,处理队列中的消息

实现过程:
导入demo工程,包括三部分:
- mq-demo:父工程,管理项目依赖
- publisher:消息的发送者
- consumer:消息的消费者
Publisher实现
建立连接—>创建Channel—>声明队列—>发送消息—>关闭连接和Channel
1
2
3
4
5
6
7
8
9
10
11
12
13
14
15
16
17
18
19
20
21
22
23
24
25
26
27
28
29
30
31
32public class PublisherTest {
public void testSendMessage() throws IOException, TimeoutException {
// 1.建立连接
ConnectionFactory factory = new ConnectionFactory();
// 1.1.设置连接参数,分别是:主机名、端口号、vhost、用户名、密码
factory.setHost("192.168.150.101");
factory.setPort(5672);
factory.setVirtualHost("/");
factory.setUsername("itcast");
factory.setPassword("123321");
// 1.2.建立连接
Connection connection = factory.newConnection();
// 2.创建通道Channel
Channel channel = connection.createChannel();
// 3.创建队列
String queueName = "simple.queue";
channel.queueDeclare(queueName, false, false, false, null);
// 4.发送消息
String message = "hello, rabbitmq!";
channel.basicPublish("", queueName, null, message.getBytes());
System.out.println("发送消息成功:【" + message + "】");
// 5.关闭通道和连接
channel.close();
connection.close();
}
}factory.setVirtualHost("/")对应这里的虚拟机
Consumer实现
建立连接—>创建Channel—>声明队列—>订阅消息
1
2
3
4
5
6
7
8
9
10
11
12
13
14
15
16
17
18
19
20
21
22
23
24
25
26
27
28
29
30
31
32
33
34
35
36
37
38import com.rabbitmq.client.*;
import java.io.IOException;
import java.util.concurrent.TimeoutException;
public class ConsumerTest {
public static void main(String[] args) throws IOException, TimeoutException {
// 1.建立连接
ConnectionFactory factory = new ConnectionFactory();
// 1.1.设置连接参数,分别是:主机名、端口号、vhost、用户名、密码
factory.setHost("192.168.150.101");
factory.setPort(5672);
factory.setVirtualHost("/");
factory.setUsername("itcast");
factory.setPassword("123321");
// 1.2.建立连接
Connection connection = factory.newConnection();
// 2.创建通道Channel
Channel channel = connection.createChannel();
// 3.创建队列
String queueName = "simple.queue";
channel.queueDeclare(queueName, false, false, false, null);
// 4.订阅消息
channel.basicConsume(queueName, true, new DefaultConsumer(channel){
public void handleDelivery(String consumerTag, Envelope envelope,
AMQP.BasicProperties properties, byte[] body) throws IOException {
// 5.处理消息
String message = new String(body);
System.out.println("接收到消息:【" + message + "】");
}
});
System.out.println("等待接收消息。。。。");
}
}
SpringAMQP
SpringAMQP官方地址:https://spring.io/projects/spring-amqp, 它是基于AMQP协议定义的一套API规范,提供了模板来发送和接收消息。包含两部分:spring-amqp是基础抽象,spring-rabbit是底层的默认实现
三个功能:
- 用于异步处理入站消息的侦听器容器
- RabbitTemplate用于发送和接收消息
- RabbitAdmin用于自动声明队列,交换和绑定
简单队列模型Basic Queue
首先在父工程mq-demo中引入依赖
1 | <!--AMQP依赖,包含RabbitMQ--> |
消息发送
在publisher服务的application.yml中添加配置,添加mq连接信息:
1
2
3
4
5
6
7spring:
rabbitmq:
host: 192.168.186.128 # 主机名
port: 5672 #端口
username: root # 用户名
password: root # 密码
virtual-host: / # 虚拟主机在publisher服务中编写测试类SpringAmqpTest,并利用RabbitTemplate实现消息发送
1
2
3
4
5
6
7
8
9
10
11
12
13
public class SpringAmqpTest {
private RabbitTemplate rabbitTemplate;
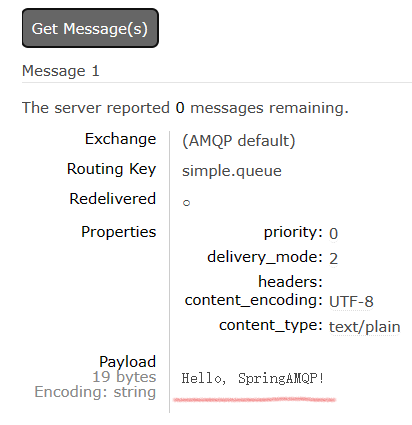
public void testSimpleQueue() {
String queueName = "simple.queue";
String message = "Hello, SpringAMQP! ";
rabbitTemplate.convertAndSend(queueName, message);
}
}springboot项目的单元测试类需要添加两个注解:
@RunWith(SpringRunner.class)和@SpringBootTest,从而能够在测试类内部进行bean的注入和自动装配
注意:这里不会自动创建队列,可以在管理界面手动创建一个队列,然后运行测试类就能获取到信息:
消息接收
在consumer服务的application.yml中添加配置
1
2
3
4
5
6
7spring:
rabbitmq:
host: 192.168.186.128 # 主机名
port: 5672 #端口
username: root # 用户名
password: root # 密码
virtual-host: / # 虚拟主机在consumer服务新建一个类,编写消费逻辑。
Spring已经帮我们跟MQ建立了连接,所以消费者只需要关心要监听哪个队列,以及要干什么事即可
1
2
3
4
5
6
7
public class SpringRabbitListener {
public void listenSimpleQueueMessage(String msg) {
System.out.println("Spring 消费者接收到消息:【" + msg + "】");
}
}@Component注解是将该类声明为一个Bean,这样Spring才能将其进行管理@RabbitListener注解声明要监听的队列,msg参数就是接收到的消息
此时启动consumer的服务,也就是启动类。此时控制台会输出:
1 | Spring 消费者接收到消息:【Hello, SpringAMQP! 】 |
注意:消息一旦消费(消费者从中接收到消息后),就会从队列删除,RabbitMQ没有消息回溯功能
工作队列模型Work Queue
Work Queue,工作队列,可以提高消息处理速度,避免队列堆积消息。让多个消费者绑定到一个队列,共同消费队列中的信息。注意:同一条消息只会被一个消费者处理
当消息处理比较耗时的时候,可能生产消息的速度会远远大于消息的消费速度,长此以往,消息就会堆积的越来越多,无法及时处理。此时就可以使用Work模型,多个消费者共同处理消息,那么处理速度就能大大提高了
案例:模拟工作队列,实现一个队列绑定多个消费者
基本思路如下:
- 在publisher服务中定义测试方法,每秒产生50条消息,发送到simple.queue
- 在consumer服务中定义两个消费者,都监听simple.queue,消费者1每秒处理50条消息,消费者2每秒处理10条消息
消息发送
publisher服务中的SpringAmqpTest类中新增测试方法
1 |
|
消息接收
模拟多个消费者绑定同一个队列,在consumer服务的SpringRabbitListener中添加两个方法
1 |
|
测试结果
1 | 消费者2........接收到消息:【Hello, SpringAMQP! __ 1】2023-08-09T14:41:24.989259900 |
通过结果发现,消费者1和消费者2都各自消费了25条信息,只不过消费者1更快。但是我们预想的并不是这样,我们设置消费者1延时少就是想让它多获取到消息,但这里确实均分了
这是因为默认存在消息预取机制,不管消费者的能力如何,都会轮流获取消息,也就是说当前的处理方式是平均分配给每个消费者,并没有按照我们设定的处理能力来处理消息,这样显然是有问题的,消费者2很大概率会出现消息积压的风险。
消费预取限制
修改consumer服务中application.yml文件,设置preFetch这个值,可以控制预取消息的上限:
1 | spring: |
此时再进行测试,可以发现满足了我们的需求
1 | 消费者1 接收到消息:【Hello, SpringAMQP! __ 1】2023-08-09T14:52:19.470963200 |
发布、订阅模型
发布订阅模型与之前的案例区别就是允许将统一信息发送给多个消费者。实现方就是加入了exchange交换机
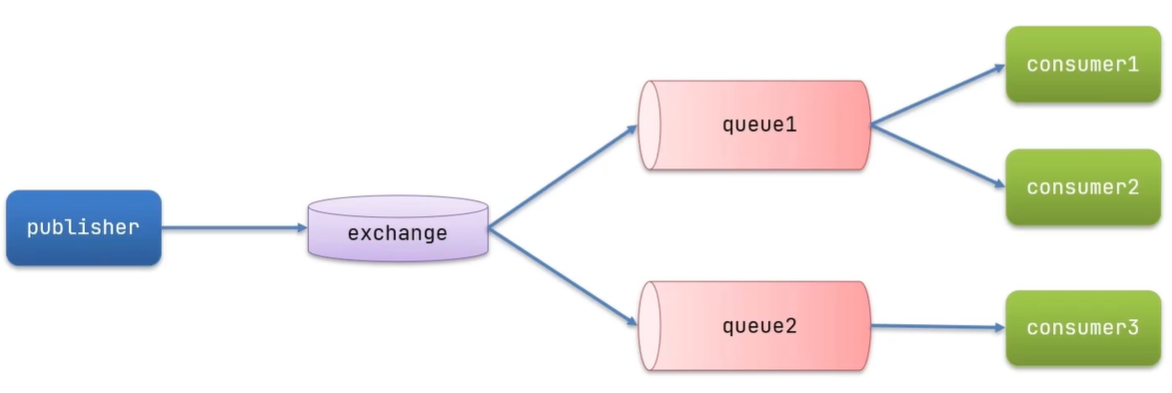
此时流程略有变化:
- Publisher:生产者,也就是要发送消息的程序,但是不再发送到队列中,而是发送给exchange(交换机)
- Exchange:交换机。一方面,接收生产者发送的消息;另一方面,知道如何处理消息,例如递交给某个特别队列、递交给所有队列。到底如何操作,取决于Exchange的类型。
- Consumer:消费者,与以前一样,订阅队列,没有变化
- Queue:消息队列也与之前一样,接收消息,缓存消息
常见的exchange类型有:
Fanout:广播,将消息交给所有绑定到交换机的队列
Direct:路由,把消息交给符合指定routing key的队列
Topic:话题,把消息交给符合routing pattern(路由模式)的队列
注意:Exchange(交换机)只负责转发消息,不具备存储消息的能力。因此如果没有任何队列与Exchange绑定,或者没有符合路由规则的队列,那么消息会丢失!
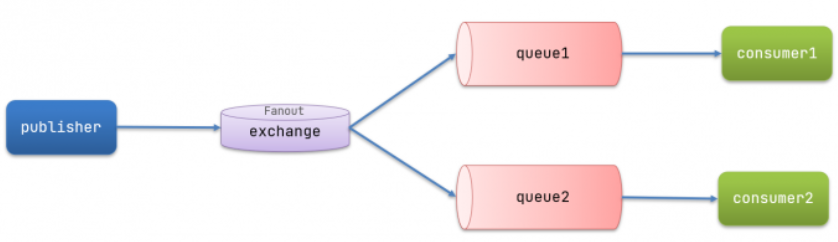
Fanout
Fanout Exchange会将接收到的消息路由到每一个跟其绑定的queue中
声明队列、交换机
SpringAMQP提供了声明交换机、队列、绑定关系的API:
实现:
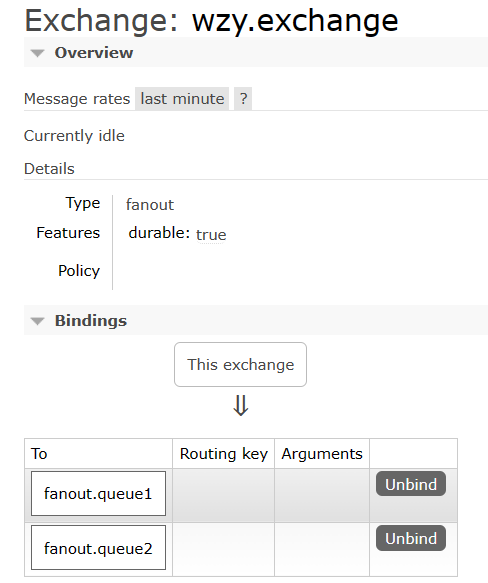
在consumer服务创建一个类,添加@Configuration注释,并声明FanoutExchange、Queue和绑定关系对象Binding,如下:
1 |
|
可以在管理界面看到绑定信息:
消息发送和接收
在publisher服务的SpringAmqpTest类中添加测试方法
1 |
|
在consumer服务的SpringRabbitListener中添加两个方法作为消费者
1 |
|
此时控制台输出:
1 | 消费者1收到广播消息:【WZY Test】 |
可以看到两个消费者获取到了同一个信息
Direct
DirectExchange会将接收到的消息根据规则路由到指定的queue,因此称为路由模式
- 每一个Queue都与Exchange设置一个BindingKey
- 发布者发送消息时候,指定消息的RoutingKey
- Exchange将消息路由到BindingKey与消息RoutingKey一致的队列
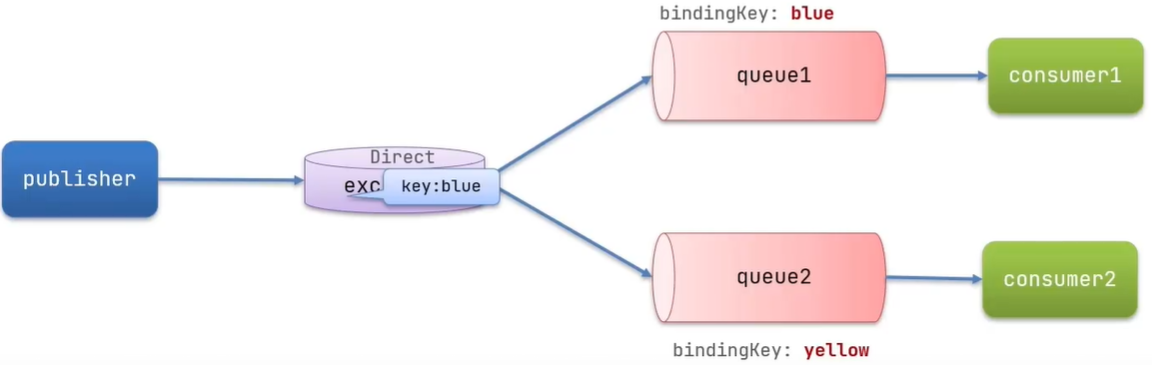
注意:队列可以绑定多个BindingKey,比如queue1可以同时绑定blue和yellow
基于注解声明队列、交换机
基于Bean的方式声明队列与交换机比较麻烦,所以Spring还提供了基于注解方式来声明
在consumer的SpringRabbitListener中添加两个消费者,同时基于注解来声明队列和交换机
1 |
|
可以看到:

消息发送和接收
在publisher服务的SpringAmqpTest类中添加测试方法
这里的LOL、PUBG、CSGO就是前面说的RoutingKey
1 |
|
此时控制台输出:
1 | 消费者2收到广播消息:【League of Legends】 |
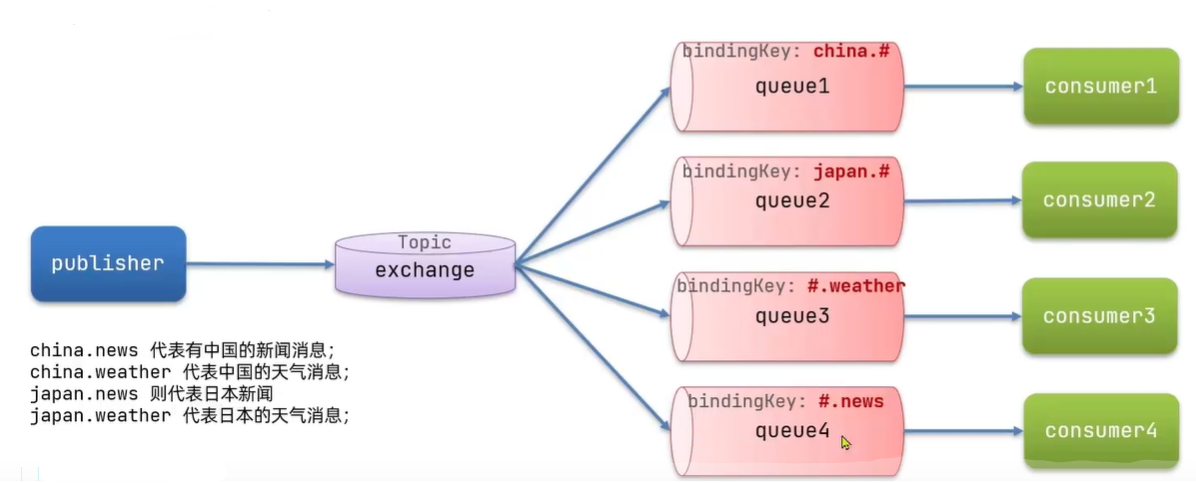
Topic
TopicExchange与DirectExchange类似,都可以根据RoutingKey把消息路由到不同的队列区别在于routingKey必须多个单词的列表,并且以.分割。例如:china.news、china.weather、japan.news
Queue与Exchange指定Bindingkey的时候可以使用通配符:
#:指代0个或多个单词*:指代一个单词
案例
声明队列和交换机
1
2
3
4
5
6
7
8
9
10
11
12
13
14
15
16
17
public void listenTopicQueue1(String msg){
System.out.println("消费者1收到广播消息:【" + msg + "】");
}
public void listenTopicQueue2(String msg){
System.out.println("消费者2收到广播消息:【" + msg + "】");
}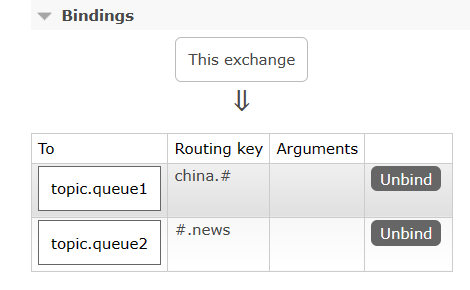
可以看到,一个队列通配符为
china.#,一个队列通配符为#.news消息发送
1
2
3
4
5
6
7
8
9
10
11
12
13
14
15
16
17
18
19
20
public void testTopicExchange() {
String exchangeName = "topicExchange";
String message = "微软将于2024年被腾讯收购";
rabbitTemplate.convertAndSend(exchangeName, "china.news", message);
}
public void testTopicExchange2() {
String exchangeName = "topicExchange";
String message = "腾讯将于2024年被微软收购";
rabbitTemplate.convertAndSend(exchangeName, "us.news", message);
}
public void testTopicExchange3() {
String exchangeName = "topicExchange";
String message = "今天天气很好";
rabbitTemplate.convertAndSend(exchangeName, "china.weather", message);
}
此时控制台输出:
1 | 消费者2收到广播消息:【微软将于2024年被腾讯收购】 |
可以看出以上结果符合前面的路由规则
消息转换器
Spring会把发送的消息序列化为字节发送给MQ,接收消息的时候,会将字节反序列化为Java对象。默认情况下,Spring采用的序列化方式是JDK序列化。但是它存在很多问题,不便于实际使用。
问题演示
首先添加一个队列,这里通过
@Bean添加config.FanoutConfig1
2
3
4
public Queue ObjectQueue(){
return new Queue("object.queue");
}通过浏览器的管理页面看到object.queue添加成功
编写消息发送
1
2
3
4
5
6
7
8
public void testObjectQueue() {
String queueName = "object.queue";
HashMap<String, Object> hashMap = new HashMap<>();
hashMap.put("name", "JackeyLove");
hashMap.put("age", 23);
rabbitTemplate.convertAndSend(queueName, hashMap);
}此时通过管理页面查看其中的内容,发现啥也看不懂,我的阿水呢?
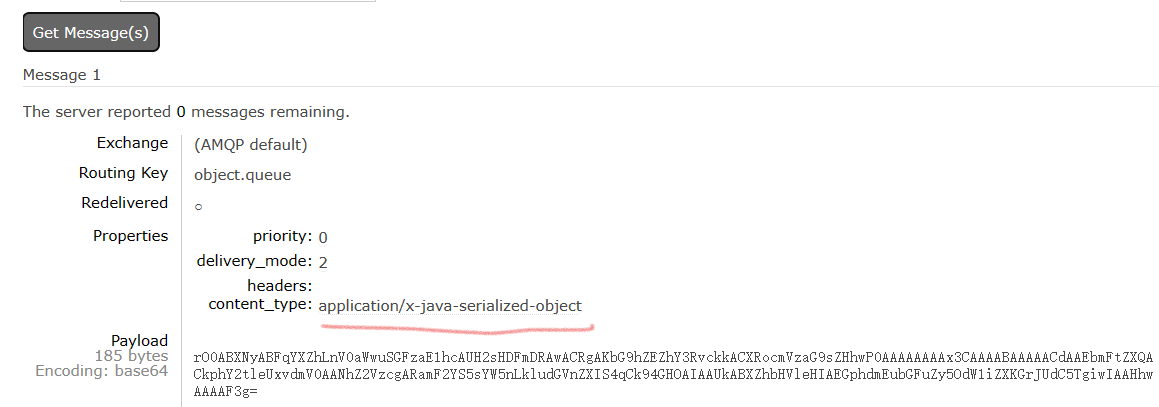
从这里看出,默认使用的JDK序列化,其存在很多缺点:
- 数据体积过大
- 有安全漏洞
- 可读性差
配置JSON转换器
这里我们可以使用JSON方式来做序列化和反序列化
发送消息:
在父工程的pom文件中引入依赖
1
2
3
4
5<dependency>
<groupId>com.fasterxml.jackson.dataformat</groupId>
<artifactId>jackson-dataformat-xml</artifactId>
<version>2.9.10</version>
</dependency>在
publisher和consumer的启动类中都添加一个Bean,来覆盖掉默认的jdk序列化的bean1
2
3
4
public MessageConverter jsonMessageConverter() {
return new Jackson2JsonMessageConverter();
}注意MessageConverter导入带
amqp的依赖
此时重新启动服务,然后发送前面的消息,这次查看到的内容如下:
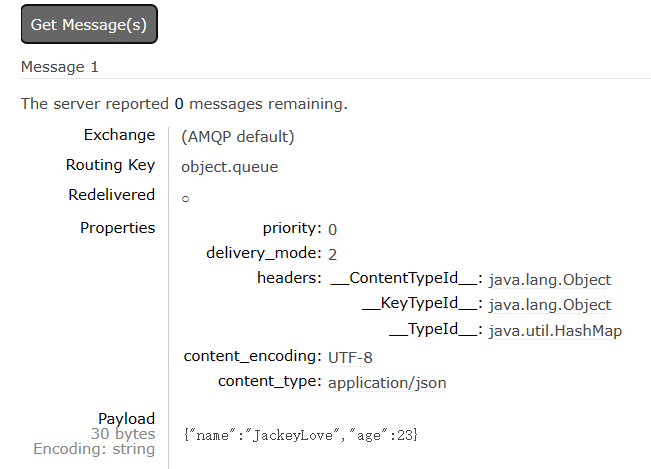
可以看到内容正常显示。
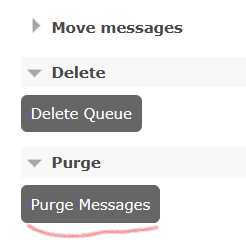
注意:再进行这一次的消息发送前,应该将之前队列中的信息进行一个清除,也就是下面的
Purge Messages
接收消息:
因为前面已经在在父工程中引入了依赖,所以不用再引了,并且在消费者的启动类中添加了JSON序列化。所以这里只要进行队列的监听并消费信息即可。
listener.SpringRabbitListener
1 |
|
注意:
consumer和publisher的序列化器需保持一致(都使用JSON序列化),同时consumer中接收数据的类型,也需要和发送数据的类型保持一致。例如上面的例子中都是用的HashMap<String, Object>
控制台打印:
1 | 消费者收到广播消息:【{name=JackeyLove, age=23}】 |
这里黑马讲的MQ就这些了,还有很多内容没有涉及,比如延迟队列等,后续有机会再学